|

|
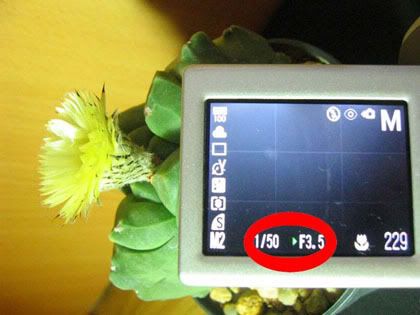 เมื่อปรับเป็น manual แล้ว จะสามารถกำหนดค่ารูปรับแสง และความเร็วชัตเตอร์ได้ครับ จากภาพ 1/50 f3.2 มีเลขอยู่สองชุดนะครับ ชุดแรก 1/50 เป็นความเร็วชัตเตอร์ หมายถึงชัตเตอร์จะเปิดค้างไว้ 1/50วินาที ยิ่งช้ามาก แสงจะเข้ากล้องได้มากภาพก็จะสว่างมาก แต่ถ้ายิ่งช้าเท่าไหร่ ก็แสดงว่ามือของเราต้องนิ่งมากขึ้นเท่านั้น เช่นถ้าปรับไปจนถึง 1-2วินาที กล้องเราก็ต้องนิ่งถึง 1-2วินาที บางทีต้องกลั้นหายใจช่วย เพื่อให้มือนิ่งได้ภาพที่ คมชัด หรือถ้ามีขาตั้งกล้อง กับอุปกรณ์ลั่นชัตเตอร์ก็จะช่วยได้มาก ชุดที่สอง f3.2 หมายถึง Aperture Value หรือ ค่ารูรับแสง เป็นค่าที่แสดง การเปิดของช่องรับแสงในกล้อง ว่ามากน้อยเพียงใด ยิ่งค่าน้อย แสดงว่าเปิดรับแสงมาก ยิ่งค่ามาก แสดงว่าเปิดรับแสงน้อย อย่าสับสนนะครับ ส่วนใหญ่ที่ผมถ่าย จะกำหนดค่ารูรับแสงให้มากที่สุด (ค่าน้อยๆ ผมใช้ประมาณ F2.8-F3.2) แล้วค่อยปรับความเร็วชัตเตอร์เอาเอง ไม่มีกำหนดตายตัว เนื่องจากต้นไม้ที่นำมาเป็นแบบ มีการดูดกลืนแสงต่างกัน ทำให้ความสว่างของภาพต่างกัน |
 สิ่งต่อไป ISO เป็นค่าที่ใช้ชดเชยแสงในกรณีที่ถ่ายในที่มืด ค่ายิ่งมากจะช่วยให้ภาพสว่างมากขึ้น แต่ก็มีข้อเสียก็คือ ถ้าปรับไว้เป็นค่ามากๆ ภาพจะมี Noise มาก (จะเห็นภาพมีเม็ดสีด่างๆ กระจายทั่วภาพ) ทำให้ภาพไม่คมชัด ผมใช้ประมาณ 100 ครับ |
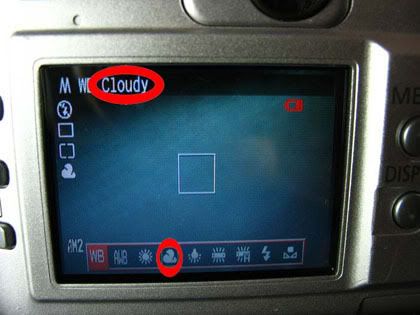
กล้องบางตัวมีfunction Cloudy ซึ่งจะปรับให้สามารถถึงสีสันของวัตถุออกมาได้มากขึ้นครับ เมื่อกำหนดค่าต่างๆได้เรียบร้อย ก็มาถึงการจัดวัตถุ จัดองค์ประกอบของภาพ และแสง ก่อนอื่น ก็ต้องทำความรูจักกับกฎสามส่วน และตารางเก้าช่องด้วยนะครับ หมายถึงกำหนดเส้นแบ่ง แนวตั้งและแนวนอน ออกเป็นสามส่วนเท่าๆกัน หากต้องการเน้นวัตถุอะไร ให้นำภาพของวัตถุนั้น มามาวางบนเส้นนั้นๆ หรือจุดตัด ของ เส้นที่กำหนด (ในหนังสือเค้าบอกว่า การวางวัตถูบนเส้นนี้ จะดึงดูดความสนใจ ไปยังวัตถุเหล่านั้นมากยิ่งขึ้นครับ) ตัวอย่างผมนำดอกของ A.myriostigma c.v.kikko วางไว้บนจุดตัดครับ 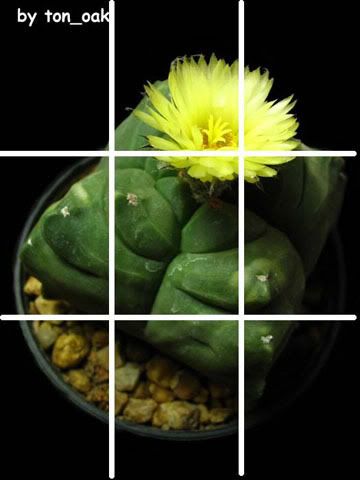 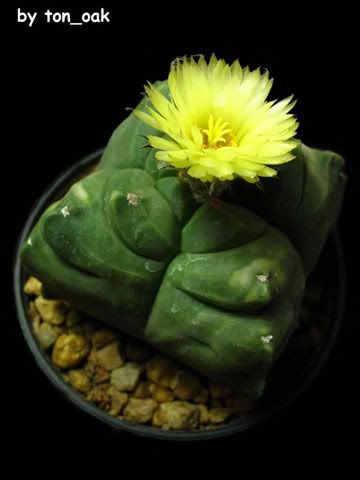 |
เมื่อถ่ายแล้วก็จะได้ผลออกมาประมาณนี้ครับ อ้อเรื่องแสงก็สำคัญ เรื่องนี้ทำให้ผมเมื่อยมือมากๆ เพราะต้องคอยขยับโคมไฟให้แสงตกตามที่ต้องการ ถ้ามีโคมหรือ หลอดไฟที่สามารถปรับขนาดของลำแสงได้ก็จะดีมาก การถ่ายภาพต้นกระบองเพชรเนี่ย เนื่องจากลักษณะของต้นมีความพิเศษทั้งเว้าโค้ง หนาม สามารถทำให้ เกิดเงาที่สวยงามได้ ต้องลองปรับ ลองเปลี่ยนมุมของแสงดูเรื่อยๆ ครับ บางภาพถ่ายกันหลายสิบรูปกว่าจะได้แสงและเงาที่เราชอบจริงๆ ภาพนี้ผมให้ไฟตกจาก ด้านบนซ้ายของต้นครับ |
 สุดท้ายก็จะได้ภาพออกมา แต่ก็อาจยังมีบางจุดที่เสียหาย หรือภาพยังไม่คมชัดเท่าที่ควร สามารถใช้โปรแกรมต่างปรับความคมชัดของภาพ หรือใส่ชื่อ ทำกรอบดู ได้ครับเช่น Photoshop, ACDSee อันนี้ต้องแล้วแต่ความสามารถแล้วล่ะ ผมก็ยังใช้ไม่เก่งเท่าไหร่ แค่ใส่ชื่อเป็นก็ดีแล้วล่ะ หะหะ |
 ตัวอย่างอีกภาพ บานวันนี้จับมาเป็นแบบซะเลย ก่อนโดนเขี่ย(เขี่ยเกสรดอกครับ) อิอิ |

ลองใส่กรอบดู
เท่านี้ก่อนละกัน ลองเอาไปทำดูนะครับ
3. Learn to love your camera's quirksbly have some friends with quick-fire responses, some who take a little longer to answer or get the joke. But you love them all the same. Your camera may be a little slow to start, a little sluggish to respond to the zoom control. If you allow for your camera's quirks, you learn how to get the best out of them.
If your camera takes a long time to start when you turn it on, then keep it on - most cameras wake from sleep more quickly than from 'off'. If shutter lag is a problem, learn to press the button just before the action completes. If the zoom control usually overshoots the setting you want, learn to release it just before you reach the setting you want.
Turn off every automatic function you don't need. The more thinking you do for the camera, the faster it can work. If you're set to a wide-angle on a point-and-shoot camera or dSLR with small sensor, you have a huge amount of depth of field to work in. In good light, there's hardly any need to focus. Try turning auto-focus off and be amazed at how much more responsive the camera is. Turn off the flash, of course, (but if you have to use it, charge up your battery till it's bulging!).
You're getting the idea: the core of camera technique is reducing the gap between you and your subject, so that it all flows effortlessly, and you can concentrate on the picture-making rather than the camera-using.
Actually, it's a good idea to keep any camera on all the time you're working - and maybe even if not. Knowing the camera is on helps keep your mind in a ready state too. And it really helps to keep the lens-cap off too. Sure, it exposes the glass - but that's what a lenshood and UV filter are for - protect your glass so that you can take pictures.
The second it takes for you to decide whether to turn the camera on or not could be a second too late. It uses up time that could have been better spent getting into position, selecting the camera angle.
Remember those leather cases which your Dad or Grandfather used to keep their cameras - they were called "ever-ready cases", but professionals sneered at them, calling them "never-ready cases." The fact is, any protection for a camera is a barrier to use. You want to sell your camera on eBay in pristine shape? Then buy another and use that instead. Keep your camera not only out of its pouch or bag, not only over your shoulder but IN YOUR HAND!
I've shared drinks with great photographers whose camera was so present, it was almost in the same hand as their beer. You might not want to be so obsessive, but tell me who gets the pictures everyone else misses? I walk around with my camera cradled in my arms - people have said it's like I'm cradling a babyu drive, if you only watched the road immediately in front of the car, you'd soon crash into something. Safe drivers read the road as far ahead as they can see or at least the distance they can stop in. Well, you'd be surprised how many photographers look no further than their personal space and time. You can tell a pro at work because she or he is often oddly present and not present: they are aware of what is going on around them, but they are constantly asking themselves 'What's going on over THERE? What's gonna happen next?'
With camera in hand, lenscap off and power on (even if the camera is quietly dozing away) your mind can be alert to all around you. What you see now is the foundation for the picture to come. In the time it takes you to get to a scene, you can plot your tactics. But if you let something surprise you, the time to think has already been forfeited.
Choosing your time
|

No comments:
Post a Comment